Not everyone runs their books in QuickBooks or Xero, and that is completely fine. Plenty of founders, freelancers, and small business owners still track expenses in a trusty Google Sheet. It is free, familiar, and flexible. The only painful part is the typing: copying the date, the vendor, the amount, and the tax off every receipt, one cell at a time.
That is the part Spendifique removes.
Spendifique can sync your captured expenses straight to a Google Sheet. After you scan, drag and drop, or email in a receipt or invoice, Spendifique reads the details for you and adds each expense as a new row in the spreadsheet you choose. No retyping, no copy and paste, and no monthly accounting software bill if you are not ready for one yet.
This guide covers why teams sync expenses to Google Sheets, exactly what the exported data looks like, and how to set it up in Spendifique in a few minutes.
Why sync expenses to Google Sheets?
Most expense tools assume you have already committed to full accounting software. Spendifique does sync to QuickBooks and Xero, but it also meets you where you actually are. If that is a spreadsheet, the Google Sheets sync gives you real benefits:
- It is free. Google Sheets costs nothing, so you get automated, structured expense data without adding another paid subscription on top of your tools.
- You can build any report you want. Once your expenses are in rows and columns, you can sort, filter, total by category, build a pivot table, or chart spending over time. Your data, your reports.
- It is easy to share. Send your accountant a single link at tax time instead of a folder of loose receipts. They get clean, readable data in a format everyone already understands.
- There is no learning curve. Your team already knows how to use a spreadsheet. Nothing new to learn, nothing new to onboard.
- You keep a running ledger. Each export appends to the same file, so you build one continuous record of spending instead of scattered exports.
- There is no lock-in. Your data lives in a portable, open format you fully control. If you move to other software later, it comes with you.
- Migrating later is painless. Your expenses stay stored in Spendifique, not just in the spreadsheet. So the day you decide to move to QuickBooks or Xero, you connect the account, sync, and your existing data flows straight in. No re-entering history.
- It is a clean handoff. When a bookkeeper or accountant takes over, you hand them organized data instead of a shoebox of receipts.
In short, you get the automation of a modern expense tool with the freedom and zero cost of a spreadsheet.
What the exported data looks like
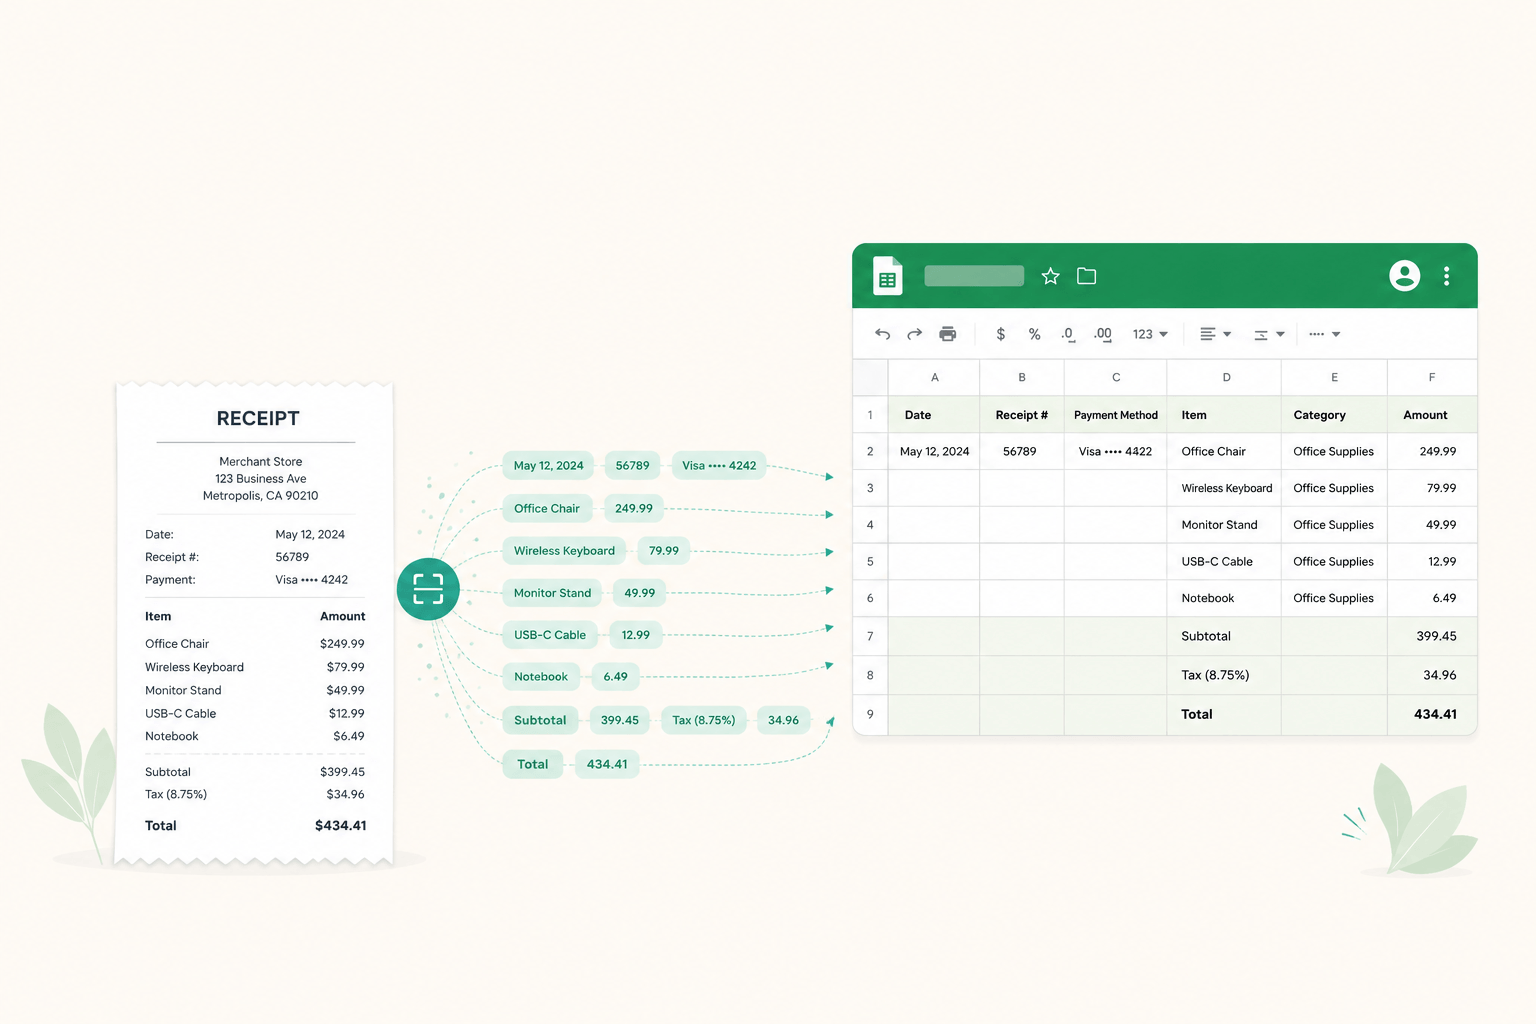
When you export to Google Sheets, Spendifique creates one row per expense and fills in consecutive columns in this order:
ColumnWhat it containsInvoice DateThe date on the receipt or invoiceInvoice #The invoice or receipt numberVendorWho you paidAccount CodeThe accounting code for the expenseAccount NameThe name of that account or categorySubtotalThe amount before taxTaxThe tax amount (this column appears when you have a Sales Tax Code turned on)TotalThe full amount paid
Because the layout is consistent, every export drops neatly into the same structure, which is what makes reporting and analysis so easy later.
How to set up the Google Sheets integration
You only need to do this once.
- In the left navigation bar, open Settings, then choose Integrations.
- Find the Google Sheets option and connect your Google account.
- On the same page, click the Configure button in the Google Sheets section.
- Choose how you want exports to behave:
- Sync to an existing spreadsheet, so new expenses append to the end of a file you already use, or
- Create a new spreadsheet each time you export.
That is it. Your integration is now ready to use.
Tip: If you want one running record of all spending, choose an existing spreadsheet. New expenses will be added to the bottom of that file each time, building a continuous ledger you can report on.
How to export your expenses
Once the integration is set up, you can send expenses to Google Sheets two ways.
Export several expenses at once
- In the left navigation bar, click Expenses to open the Expense List.
- Check the box beside each expense you want to export.
- A floating menu bar appears at the bottom of the page.
- Click the Sheets button to send the selected expenses to Google Sheets.
This is the fastest way to push a batch of receipts to your spreadsheet at the end of a week or month.
Export a single expense
- On the Expense List, find the expense you want.
- In the Action column (the rightmost column by default), click the Sync icon for that row.
Use this when you just want to send one receipt over without selecting a whole batch.
Is Google Sheets enough, or should you use QuickBooks or Xero?
Google Sheets is a great fit when you are early, keeping things lean, or simply prefer the control and zero cost of a spreadsheet. It handles tracking, reporting, and sharing well for many small businesses.
As you grow, you may want features that accounting software handles natively, like reconciliation, financial statements, and tighter audit trails. The good news is you do not have to switch tools to get there. Spendifique already syncs to QuickBooks and Xero, so when you are ready, you change your destination, not your whole workflow. Your capture process stays exactly the same.
Better still, switching does not mean starting over. All of your expenses stay stored in Spendifique, not only in the spreadsheet. So the day you decide to move to QuickBooks or Xero, you connect the account, hit sync, and your data flows straight into your new accounting software. There is no manual migration and no re-entering months of history. Google Sheets can be your starting point, and Spendifique makes the step up effortless whenever you reach it.
Frequently asked questions
Can you automatically import receipts into Google Sheets?
Yes. With Spendifique, you scan, drag and drop, or email in a receipt, and the details are extracted and added as a new row in your chosen Google Sheet. You do not type the data in by hand.
How do I export expenses to Google Sheets in Spendifique?
Connect your Google account under Settings, then Integrations, and click Configure to choose your spreadsheet. After that, open the Expense List, select the expenses you want, and click the Sheets button in the floating bar at the bottom of the page. You can also sync a single expense using the Sync icon in the Action column.
Does the export add to my existing sheet or create a new one?
Both are options. In the Configure settings you can choose to append new expenses to the end of an existing spreadsheet, or to create a new spreadsheet each time you export.
Is Google Sheets good for expense tracking?
For many small businesses and early-stage companies, yes. It is free, flexible, easy to share, and simple to build reports from. The main downside is manual data entry, which is exactly what Spendifique removes by capturing and syncing the data for you.
Can I switch to QuickBooks or Xero later?
Yes. Spendifique syncs to QuickBooks and Xero as well, so you can change where your expenses go without changing how you capture them.
Stop typing receipts into spreadsheets
If you are still entering expenses into Google Sheets by hand, you are doing work Spendifique can do for you in seconds. Scan or email in your receipts, let Spendifique extract the details, and sync clean rows straight to your spreadsheet.
Start your free trial and connect Google Sheets in minutes.